Community Page Overview
Community pages are defined by two separate files:
- Community page markdown file, describing the community
- Pathway list text file, defining the pathway list for the community
Creating a new community is as easy as creating these two files and adding them to the appropriate repositories; making updates to an existing community similarly involves editing the two files for an existing community. The two files have specific requirements on format and content described below. Here's what's needed for creating/editing a Community:
- A free GitHub account.
- Clone wikipathways-database.
- Clone wikipathways.github.io. Refer to the README for instructions on how to build the site locally for testing purposes.
- You can edit the files (markdown and text) in any text editor, but a code editor is recommended, for example Visual Studio Code.
- Create your new Community files, or make edits to existing files, then create pull requests for your changes. If you have write access for wikipathways-database and wikipathways.github.io, you can simply commit your changes.
Create or Edit a Community Page
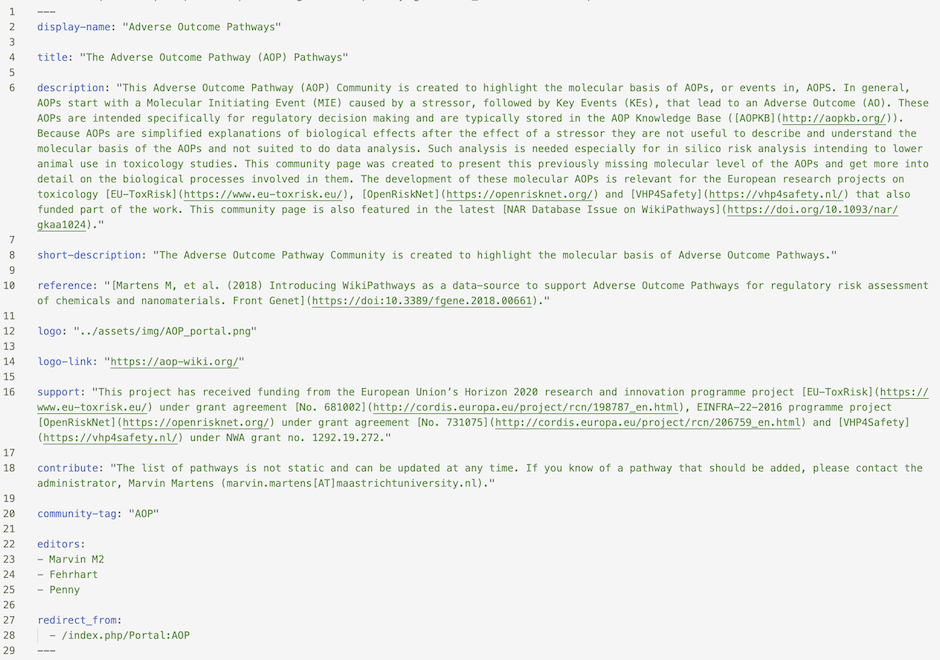
All Community pages are designed using the same template layout, and the content of each Community is defined in a markdown file in the communities directory. To be processed correctly by Jekyll, the markdown file must have a YAML front matter block at the beginning of the file, defining a set of custom variables. The front matter must be contained within a set of triple-dashed lines (---). After the front matter code, the file can contain additional html for custom content. The variables defined for WikiPathways Communities are:
- display-name: The name of the Community displayed on the Communities page.
- title: The page title at the top of the page.
- description: Text describing the Community.
- short-description: One or two sentences describing the Community, displayed on the Communities page.
- logo: a link to a png image (optional).
- logo-link: URL for an external resource (optional).
- logo-height: Override for the logo from the default height of 40px (optional).
- support: Text describing any funding support for the Community (optional).
- contribute: Text describing how to contribute to the community (optional).
- community-tag: The relevant community tag. This should match the filename of the text file with the list of Community pathways. The pathway display on the Community page is automatically generated based on this tag.
- editors: Community editors listed under Contact.
- redirect_from: Partial URL on the old WikiPathways site to redirect from.
As an example, the below image shows the markdown for the Adverse Outcome Pathways Community.
To create or edit the Community page for a community, either make your changes on a local clone, or use the GitHub web interface directly (requires write access).
- Making edits without write access: Create a new .md file for your community based on the above format, or edit an existing page on a local clone. Pro-tip: to create a .md new file, simply copy the contents of an existing file, paste into your new .md file, update the content to match your new community, and save as a new .md file. Next, create a pull request for the main wikipathways.github.io repo.
- Making edits with write-access: Access an existing Community profile from the WikiPathways website by clicking the Edit community profile button (pencil icon) next to the title of the Community at the top of the Community page.
Create or Edit the Community Pathway List
The pathway list defined for each Community is simply a flat file list of all WikiPathways Identifiers (WPIDs) relevant for that Community. The list of pathway IDs for each Community is stored in the wikipathways-database repository, in the communities directory.
To create or edit the Community pathway list for a community, either make your changes on a local clone, or use the GitHub web interface directly (requires write access).
- Making edits without write access: In the communities directory, create a simple .txt file with the relevant WPIDs listed as one column, no header, or update an existing pathway list file.
- Give the the .txt file a name that can also be used as the community-tag. These two must be identical. In the example above (AOP Community), the name of the pathway list file and the community-tag is "AOP". Next, create a pull request for the main wikipathways-database repo.
- Making edits with write-access: Access an existing Community pathway list from the WikiPathways website by clicking the Edit community pathways button (pencil icon) next to the Community Pathways section (requires write access).